Disclaimer: For educational purposes only.
Hardware Requirements:
D-Link DIR-878 A1
Product Overview:
IF YOU HAVE NEW D-LINK FOR INSTALL FOLLOW THIS STEP;
New Install the D-Link routers to OpenWrt by D-Link Recovery GUI
1. Unplug all except power
2. Press and hold the reset button on the device and re-plug the power without releasing the reset button
3. Continue to hold the reset button until the red/orange power light starts blinking
4. On the computer, manually assign a static IP address on the 192.168.0.xxx subnet, other than 192.168.0.1 (e.g. 192.168.0.2)
5. Open a web browser and navigate to http://192.168.0.1
6. download firmware at
https://downloads.openwrt.org/releases/
select
folder targets/ramips/mt7621/
For new installation select file
openwrt-xxxx-ramips-mt7621-dlink_dir-878-a1-squashfs-factory.bin
7. Choose the firmware file you want to flash and click on “Upload”
8. After the file has been uploaded, you should see a “Device is upgrading the firmware” message on the web browser
9. Wait while the device verify the uploaded file and flash the firmware
10. The device will reboot automatically after the flashing process finishes
Open a web browser and navigate to http://192.168.1.1
IF YOU HAVE NEW D-LINK FOR INSTALL FOLLOW THIS STEP;
Upgrade Firmware ;
System -> Backup/Flash Firmware
Reset to defaults : Perform Reset
In my opinion, it's best to make coffee immediately because it takes a long time
reload your current interfaces to get new IP
Open a web browser and navigate to http://192.168.1.1
download firmware at
https://downloads.openwrt.org/releases/
select
folder targets/ramips/mt7621/
For upgrade select file
dlink_dir-878-a1-squashfs-sysupgrade.bin
System -> Backup/Flash Firmware
Flash new firmware image
image : select to new download file for upgrade
If you run out of coffee, please make more
The router after upgrade then restart automatically, this takes a very long time
Open a web browser and navigate to http://192.168.1.1
BASIC CONFIGURATION FOR GATEWAY
Edit System Properties
System -> System
On General Settings Tab
Set Hostname : --set your host--
Set Timezone : --set your timezone--
Save & Apply
Efforts were made to make the names vague, like the names of cellphones, not the names of fish
edit SSH Access port
System -> Administration
On SSH Access tab
Set Interface ; --set your port 4 SSH--
Set Port ; --set your port 4 SSH--
Save & Apply
EDIT PORT WEBMANAGEMENT
open putty then
EDIT TO PORT 83
config uhttpd 'main'
list listen_http '0.0.0.0:83'
list listen_http '[::]:83'
or with winscp set file protocol to SCP
Setup Network -> DHCP and DNS
On General Tab
set Local domain : your domain
On Devices & Ports Tab
set Listen interfaces : lan
Save & Apply
Setup Network -> Wireless
Remove All Wireless
Save & Apply
Setup Network -> Interfaces
on Interfaces tab
Delete All interfaces Except lan interface
Save & Apply
Edit lan interface
set IPv4 address ; your IP
set IPv4 netmask ; your netmask
Save
then Save & Apply
Click again for Edit lan interface
on Advanced Settings tab
set Use default gateway : uncheck
set Delegate IPv6 prefixes : uncheck
set IPv6 assignment length : disabled
on DHCP Server tab
on General Setup tab
set Limit : Maximum number of leased addresses.
on IPv6 Settings tab
set RA-Service : disabled
set DHCPv6-Service : disabled
Save
then Save & Apply
Setup Network -> Interfaces
on Devices tab
Select br-lan interface to Configure
on General device options tab
set Enable IPv6 ; disabled
on Advanced device options tab
set Enable STP ; checked
set Enable promiscuous mode ; enabled
set Accept local ; enabled
Save
then Save & Apply
REBOOT PERIODIK
Open PUTTY
/etc/init.d/cron start
/etc/init.d/cron enable
After that, Open luCI, then open it System > Scheduled Tasks.
Auto reboot every day at time 04:30 WIB ( recomended )
copy this
30 4 * * * sleep 70 && touch /etc/banner && reboot
plug your cable internet to wan port on yellow colour


OR CONNECT WIFI which has existed TO GET INTERNET
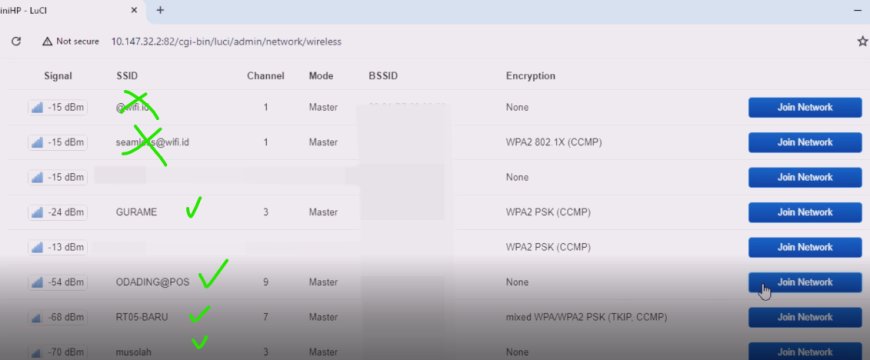
Dont use Wif 5G because for used Gateway and dont join SSID : seamless@wifi and @wifi.id
Coz 1 Connection for 1 Mac Address


update repo
system -> software -> update lists
after update complete on installed search with key = wpad
then remove wpad-basic-wolfssl
then install wpad and thick at Allow overwriting conflicting package files
Install watchcat for WAN monitoring
Setup Network -> Wireless
Remove All Wireless
Save & Apply
THEN Open WINSCP to edit file /etc/config/wireless

Set radio0 to disabled
config wifi-device 'radio0'
option type 'mac80211'
option path '1e140000.pcie/pci0000:00/0000:00:00.0/0000:01:00.0'
option channel '1'
option band '2g'
option htmode 'HT20'
option cell_density '0'
option disabled '1'
save
Setup Network -> Interfaces
on Interfaces tab
Delete All interfaces Except lan interface
Save & Apply
THEN REBOOT OPENWRT
Open a web browser and navigate to http://yourcurrentip:port
SETTING FOR WMS SOURCE
Setup Network -> Wireless
Select radio1 with 5GHz for bitrate up 100 mb then Scan
Join Network to SSID ; seamless@wifi.id
Replace wireless configuration ; checked
WPA passphrase : uptoyou
Lock to BSSID ; checked
Submit
Interface Configuration
On tab Wireless Security
Encryption ; WPA2-EAP (strong security)
Cipher ; Force TKIP and CCMP (AES)
EAP-Method ; PEAP
Authentication ; EAP-MSCHAPv2
Identity ; buy seamless account at online shops
Anonymous Identity ; blank
Password ; •••••••••••••
SAVE
Save & Apply
SETTING FOR WIFI-ID SOURCE
Setup Network -> DHCP and DNS
On Hostnames Tab
Add New Hostname
welcome.wifi.id
10.232.0.8
welcome2.wifi.id
10.233.16.13
welcome3.wifi.id
118.98.34.148
logout.wifi.id
10.233.16.13
Ip.wifi.id
36.86.63.182
Save & Apply
OPEN PUTTY to install SCRIPT AUTOLOGIN BY KOPIJAHE
opkg update && opkg install curl ca-certificates
cd /tmp
curl -sSL https://install.kopijahe.my.id -o /tmp/kopijahe
sh /tmp/kopijahe -i
Setup System -> Startup
On Local Startup Copy this script and replace all
# Put your custom commands here that should be executed once
# the system init finished. By default this file does nothing.
sleep 10 &&
kopijahe &
exit 0
Setup Network -> Wireless
Select radio1 with 5GHz for bitrate up 100 mb then Scan
Join Network to SSID ; @wifi.id
Replace wireless configuration ; checked
Lock to BSSID ; checked
Submit
Interface Configuration
On tab General Setup
Copy BSSID to get your mac and paste to new temporary place
Encryption ; No Encryption (open network)
 SAVE
SAVE
Save & Apply
FIRSTIME CONNECTION TO WIFI-ID
OPEN PUTTY
kopijahe -l "no" -u "username@violet" -p "password" -v "wifi.id" -a
THEN Open WINSCP to edit file /etc/config/kopijahe

config autologin
option multi_autologin '0'
option loadbalance 'no'
option username 'youraccount@violet'
option password 'password'
option wifivariant 'wifi.id'
option tipelogin 'login'
option gwid 'your current gwid'
option clientmac 'your BSSID for mac'
option wlanid 'your current wlanid:@wifi.id'
option sessionid 'your current sessionid '
option serverid 'welcome2.wifi.id'
option cpcprovider 'kopijahe'
option cpcretry '2'
option cpctimeout '3'
option cpcuseping 'true'
option sleeptime '8'
LOGIN MANUALLY OR REBOOT OPENWRT
OPEN PUTTY FOR LOGIN MANUAL
If there is ' Login Sukses' your configuration is correct.
FOR MONITORING WAN CONNECTION SET 6 minute
Setup Services -> Watchcat
set Periode : 6m
Save & apply
You can watch this lesson on YouTube to understand better. Don't forget to help our channel to develope further so that, there is nothing that can't be done except https://disiniaja.id.